As a scenario, I didn't think it was all that exciting to play, but it gains more importance when played in the context of a campaign.
After the game, rolls are made to see how many Will points the Nazgul recover. Being essentially immortal, they automatically recover their wound, if it was lost (unlike members of the Fellowship or other mortal heroes!).
As it happened, they recovered quite well, although the Witch King and one Ringwraith will start Scenario 2 with 2 less Will than normal.
I think it was probably a mistake to try and engage the Dunedain is so much combat, as they turned out to be tougher than expected. Still, the game had a few surprises and was a promising start to the campaign.

Saturday 29 January 2011
The Hunt Begins: Turn 10-11
 In the final two turns of the game, the Witch King managed to beat off 6 attackers and then one initiative to move off the board in turn 10.
The Hunt Begins: Turn 7-9
 1) With the Witch King having broken through the defensive line of Dunedain, the next few turns were more a race as a hoard of persuers chased him. A string of failed courage checks stopped the Dunedain from bringing their numbers to bear.
2) A reinforcement arrived and moved to intercept the other Nazgul. Although the Dunedain was beaten off in combat, the Nazgul was still obliged to lose one point of Will. This meant that the second Ringwraith was banished and the Dunedain had won!
At this point the game would normally have ended, but as it was part of a campaign it was important to see if the Witch King would lose much more Will before he escaped.
The Hunt Begins: Turn 6
 1) In another shocking omission of annotation, I failed to show that two of the Dunedain failed their courage checks to charge the Witch King. The other two made it into combat, however. One used a point of Might to modify his attack roll to win the fight, but didn't succeed in wounding.
2) Although the Nazgul loses the fight, with 4 dice being rolled to his one, he is unscathed. Spear armed troops are able to support allies in combat. If a friend is in base combat with an enemy, a spear armed ally can add one attack if they are in contact with that ally, without needing to contact the enemy themselves. Hence the Dundain as pictured roll a total of 4 dice, even though only two are in contact with the Nazgul. In this kind of situation there is an added benefit of supporting figures not counting as attacking. So once the first two Dunedain are in contact, the two with spears do not need to make courage rolls before they move.
The Hunt Begins: Turn 5
 1) In a surprise turn of events, the Dunedain catch up with the Nazgul and, outnumbering one (not the Witch King), manage to banish it. Nagul can be banished by exhausting their Will points or by causing them one wound. Being quite tough, a 6 is required for the Dunedain to wound a Ringwraith. This might not seem so hard when in this instance there were 3 of them rolling to wound, but remember that the Nazgul in this scenario are quite weak and have no Might or Fate points. In other scenarios they are extremely formidable.
2) Another shock! Both the Dunedain who have been attracted by the noise of battle were clearly not expecting to stumble across a Ringwraith and fail their courage checks to charge.
3) The lone Nazgul seems to be doing a good job of breaking through and kills one of his pursuers.
The Hunt Begins: Turn 4
 1) The Witch King uses the 'Black Dart' magic power to kill the Dunedain left with no fate at the end of last turn. Both the Nagul try and slip round the group of Dunedain, deciding that it is better to focus on the objective rather than get bogged down in a fight they could well loose.
2) The lone Nazul continues to advance and is engaged by 3 Dunedain. Despite the odds, a roll of a 6 and a higher fight value means that the Nazgul beats off his attackers, although fails to wound one of them.
3) The scenario special rules allow for Dunedain who have been killed to move back on the table as reinforcements, if a die roll for a figure is a 6. A roll of double 6 means that both the Dunedain can be brought back on!
Friday 28 January 2011
The Hunt Begins: Turn 3
 1) The two Nazgul move forward and the Dunedain charges. Originally two of them were going to attack, but the one near the yellow bush failed his courage roll. Nazgul cause terror, meaning that checks are required by all models trying to charge them. Another Dunedain has moved up next to the one which failed the check. In the combat phase the Dunedain loses to the Nazgul but is saved by spending a fate point (the picture is incorrectly annotated to show he was killed. Whoops.).
My notes are a bit unclear about what was happening in the lower right corner of the picture. But I believe that one Dunedain was killed by the lone Nazgul and another one failed his courage check to charge.
One thing that is good about this system, but which I was actually unsure about at the start, is that combat between two opponents is decided by a simple dice off, with ties being decided by whoever has the higher fight value. At first I thought this was a bit simple and random, but after playing a few games it seems to me that it has much merit as more long winded combat systems. There is little different effect to the '4+ to hit' rolls which are often part of Warhammer and essentially a 50% chance of hitting. It saves on having to look up target rolls to hit and means combat has a more simultaneous feel. The dynamic nature of the combat is increased by having the loser move back 1", which in more massed combat give a good 'ebb and flow' feel.
Within this system, heroes with multiple attacks have a suitable advantage (usually rolling 2 or 3 dice against a lone enemy's 1) but still need to be careful they are not overwhelmed by sheer numbers.
Finally, while more of a skirmish game, it still rewards grouping together figures into units as it makes individuals less likely to be engaged 2-1. Without going into all the detail now, the LoTR system is actually a lot deeper than it might appear on the surface.
The Hunt Begins: Turn 2
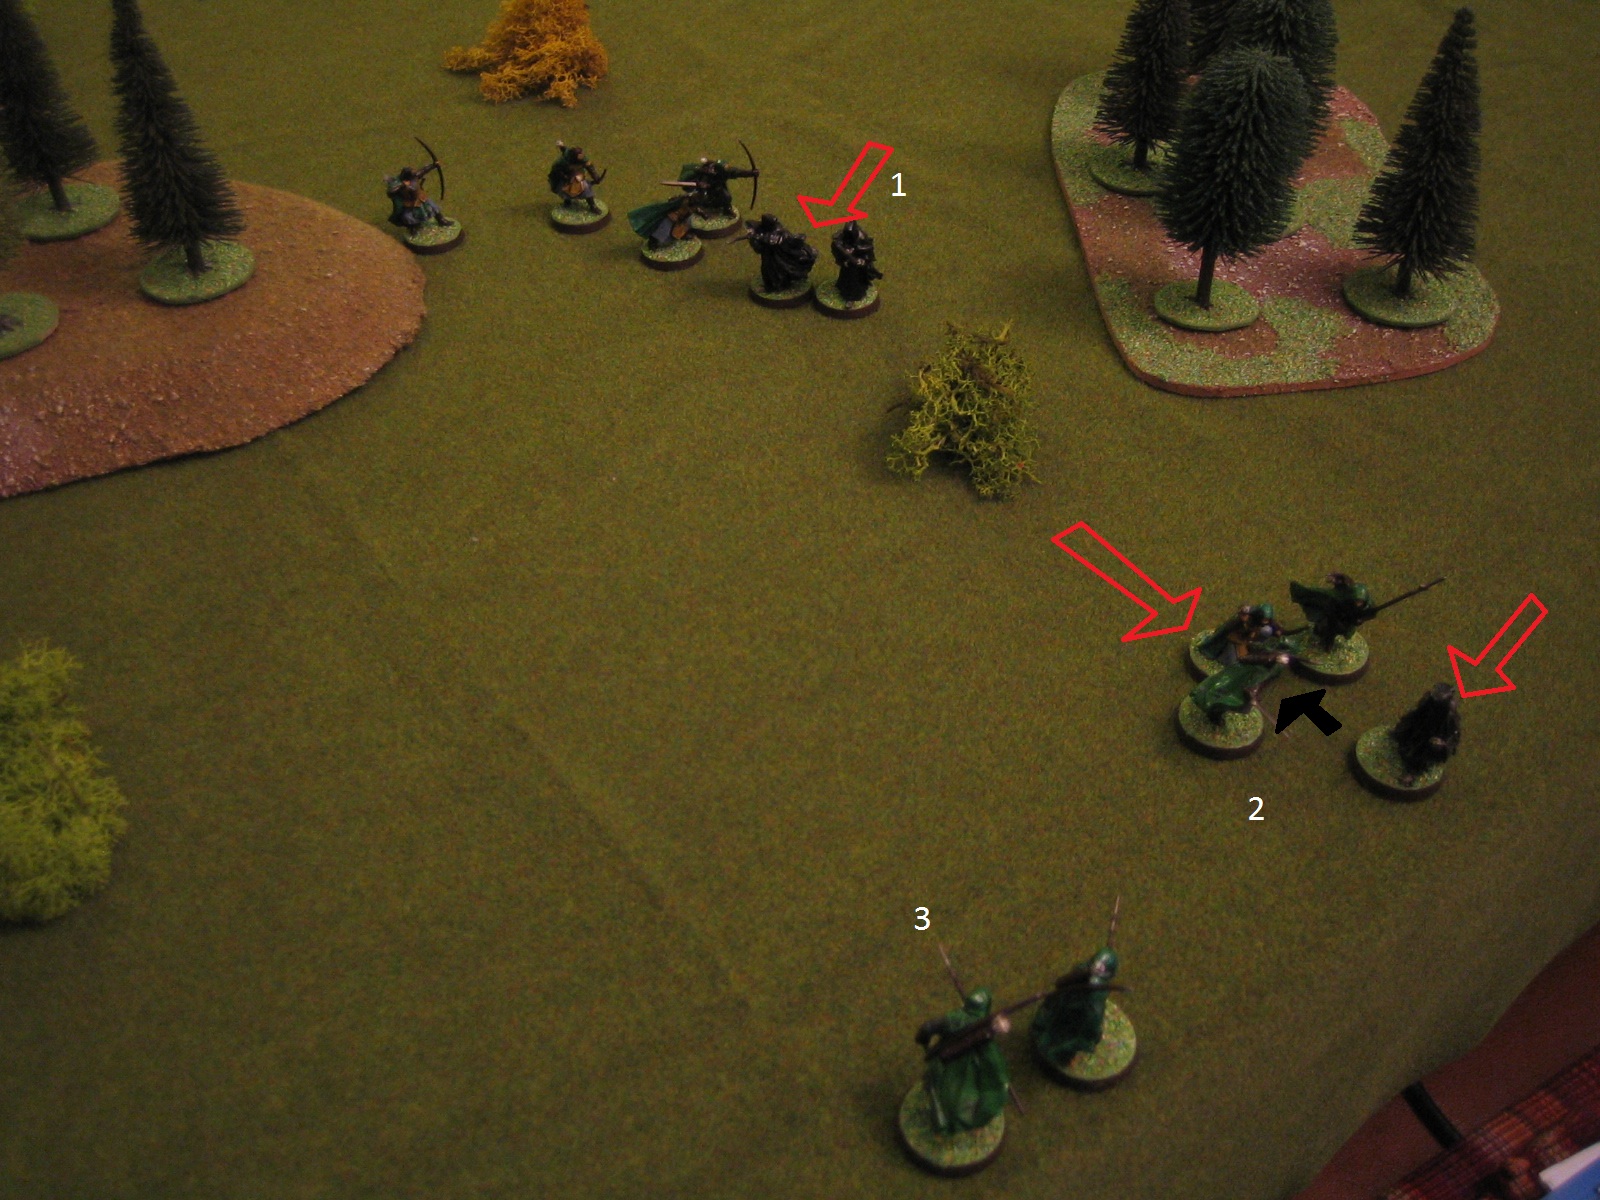
 1) Four Dunedain are now moving towards the single Ringwraith in the hope of overpowering it. Although the Nazgul are formidible foes, they are relatively weak this far from Sauron and the Dunedain are all heroes having one point each of Might, Will and Fate to help them in combat. Might is used to modify die rolls (1 pip for 1 point spent), Will is used to cast and resist magic, Fate allows heroes to roll to avoid losing a wound on a 4+. The Nazgul only have 6 Will (10 for the Witch King) in this scenario. As they loose 1 Will per round they are in combat and are banished when they reach zero, they will likely be saving their Will, rather than using it for spells.
2) The Witch King and Nazgul head straight for the Dunedain.
3) The other Nazgul continues its advance.
4) The Dunedain shoot with their bows, but are ineffective. This would be the only ranged combat in the game, as I had not realised just how unlikely it would be to wound Nazgul in this way until I looked up the target for the roll! (A 6 followed by a 5+!!!)
The Hunt Begins: Turn 1
 1) The lone Ringwraith was set up as a distraction for the Dunedain, hoping that they would be easier to defeat if their forces were split. It skirts the edge of the forest.
2) The Witch King and the other Wraith move forward.
3) Some of the Dunedain head towards the single Wraith to cut it off
4) Other Dunedain move to intercept the Witch King and friend.
Set Up: The Hunt Begins
Finally managed to play the first scenario and edit the pictures for the report. You will be able to tell by the quality of the arrows that I really need to get some decent image editing software. I would have expected paint to allow you to rotate arrows, but it appears not, so for the time being my hand drawn ones will have to do!
The table:
 The terrain for the game represents an area close to the Brandywine river, on the outskirts of the Shire. It is lightly wooded, with a couple of hills and some rough terrain, broken up by scattered bushes.
The Set Up:

The table:
 The terrain for the game represents an area close to the Brandywine river, on the outskirts of the Shire. It is lightly wooded, with a couple of hills and some rough terrain, broken up by scattered bushes.
The Set Up:

The three Ringwraiths enter from the left of the table, while the Dunedain set up on and around the hill at the centre of the board.
In order for the Ringwraiths to win the scenario, they need to move at least 2 of their number off the oposite edge of the table.
In order for the Ringwraiths to win the scenario, they need to move at least 2 of their number off the oposite edge of the table.
Tuesday 18 January 2011
The Hunt Begins: Participants
The forces are now ready for the first scenario. Here are a couple of pics:
 The Witch-king and two Ringwraiths approach the border of the Shire...
 ... and the Dunedain emerge from the forest to stop them.
Hopefully the next post will be the skirmish itself.
Next to paint: 5 more Nazgul so I have the full complement of 8 + the Witch-king (required for scenario 2) and Frodo, Sam and Pippin in preparation for scenario 3...
Next terrain: I need to prep some more trees. If I can get hold of some extruded polystyrene I will also be making some rocky outcrops.
LotR
Currently painting up 9 Dunedain for my latest project!
I have recently been building up my collection of Lord of the Rings figures and sourcebooks. My plan is to play though the 3 campaigns matching the books/films, painting the figures and making the terrain as I go. This should be an interesting project to undertake and also make for an interesting solo gaming experience, with an interesting narrative replacing repetative one-off battles.
Scenario 1: The Hunt Begins, takes place after Sauron has discovered from Gollum that the One Ring is in the possesion of a creature called 'Baggins' in a land called 'Shire'. He has dispatched the Ringwraiths, who have found out where the Shire is and are now approaching it's borders. But the Shire is not unprotected. The Rangers of Arnor have long protected this peaceful land and will sell their lives to prevent the Nazgul from crossing into the Shire.
The scenario sees 9 Dunedain (plus reinforcements as the game goes on) trying to prevent 3 Ringwraiths from getting two of their number off the board and into the Shire. Being this far from Sauron's influence, the Ringwraiths are relatively weak, but 3 of them are still a formidable force.
When the figures are all ready I hope to post a full report on the battle.
Subscribe to:
Posts (Atom)